After pushing my site to GitHub and verifying that it worked at davidensinger.github.io, I then went to set up my custom domain name. The documentation provided by GitHub is clear on the subject, but I still managed to forget about my subdomains. For more than eight hours, anyone who attempted to visit davidensinger.com was served with a 404, which is rather embarrassing for one who makes a living as a developer.
In the interest of helping others avoid the mistakes I made, here’s a guide to setting up the DNS for GitHub pages on Namecheap, my registrar of choice.
Please Note: I no longer use Namecheap to host the DNS for this site. See my new setup at Transferring the DNS from Namecheap to CloudFlare for GitHub Pages.
This guide was most recently updated with new settings to support Faster, More Awesome GitHub Pages.
Namecheap DNS doesn’t support an ALIAS record for the APEX domain, so you’ll need to use two A records for our DNS, per the instructions in the Using a custom domain with GitHub Pages. This will not allow you to use the content delivery network, but will still help protect your site against denial of service attacks.
Add a CNAME File to your Repo
Create a new file and put your domain name in it. Save it as CNAME and commit it to your GitHub repo.
yourtldomainname.comFind your Host Records
Log into your Namecheap account and navigate yourself over to your Domain List, which you can find in your Dashboard. Find the desired domain name from your Domain List, and then hover over the small house icon to reveal the Advanced DNS option. Click it!
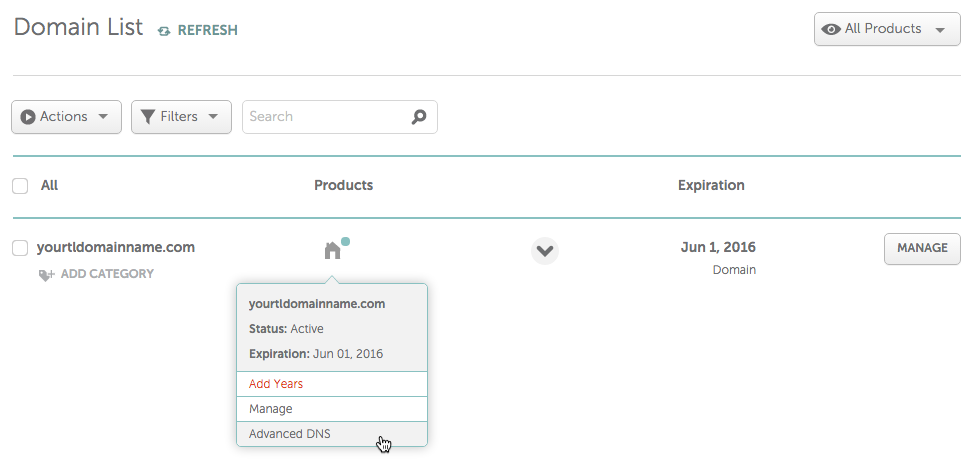
Alternatively, you could also click the Manage button and then navigate to the Advanced DNS tab.
Set up the DNS
You’ll need to set up three different records:
- Click the Add New Record button and then select
A Recordfrom the list. You’ll then want to enter@for Host and192.30.252.153for IP Address. Leave the TTL asAutomatic(use this setting for all three records). - Add another new
A Recordwith the same@for the Host, but use192.30.252.154for the IP Address. - Finally, add another new record, but select
CNAME Record. For Host setwwwand for the IP Address use yourusername.github.io.(with trailing period).
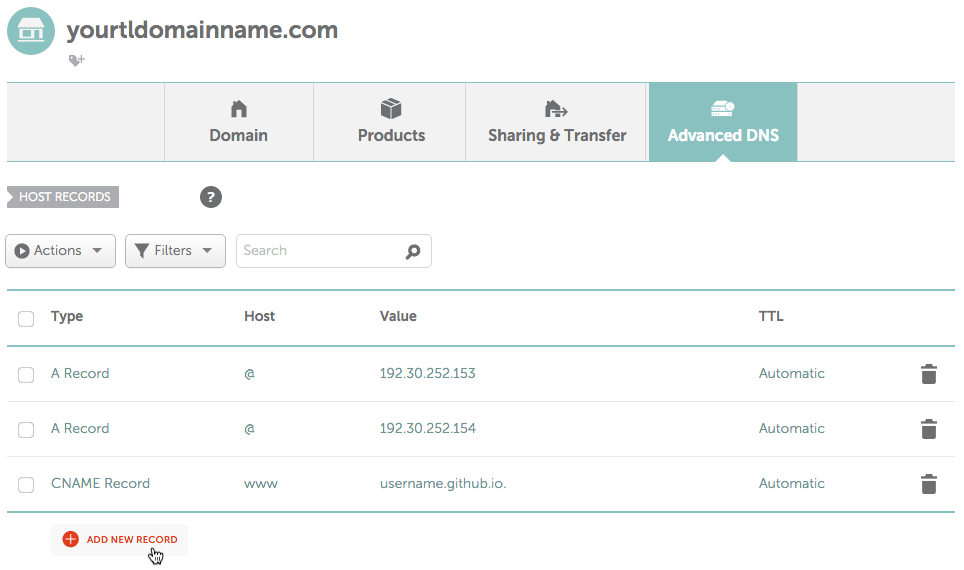
Save and then you’re all set! Please note, however that it may take some time for the changes to the DNS to propagate.
More Info: Google has a pretty good Basic Guide to DNS.